Post Injection Exercise Examples
| Quadriceps & Hip Flexor Stretch |
Sets: 2-3 Hold: 20-60secs |
 |
- Stand holding the back of a chair for balance.
- Place the foot of your operated leg on a chair or table behind you.
- Stand up tall, and push hips forward until stretch is felt in the front of the thigh.
- Bend the supporting leg to increase the stretch.
|
| Kneeling Hip Flexor Stretch |
Sets: 2-3 Hold: 20-60secs |
 |
- Initially kneel on a soft/padded surface, with the knees of both legs at 90˚ - the affected side should be at the back
- Whilst ensuring the trunk remains straight (no arching of the lower back), gently push the pelvis forward
- Emphasis should be placed on keeping the back straight, not arching the back and ensuring the pelvis remains level and not rotated
- A stretch should be felt through the front of the hip and thigh
|
| Thigh Abduction (Theraband) |
Sets: 2-3 Reps: 15 |
 |
- Lie supine (on your back) or seated (with the back supported) dictated by comfort
- Bend both knees with your feet flat on the plinth/bed
- Wrap the theraband around your thighs/knees, and open your knees against the band resistance
- Hold the contraction for 1-3 seconds, and then return to start position slowly
|
| Bridging (with theraband abduction) |
Sets: 2 Reps: 15 |
 |
- Lie on your back with the knees bent and feet flat on the floor, with arms resting by the sides (1)
- Ensure the band is tied firmly around the lower thighs, and squeeze out against the band throughout the lift (1)
- Lift the pelvis and trunk from the floor, until the trunk and thighs are aligned (2)
- Hold the position for 1-2 seconds, breathing normally
- Slowly lower the trunk and pelvis to the floor
|
| Single-Leg Bridge |
Sets: 2-3 Reps: 10 (left only) |
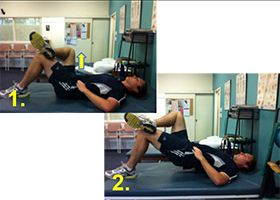 |
- Assume the start position by bending the knee of the affected/operated limb as per the above bridge position, ensuring the foot is flat on the plinth/floor
- Proceed to raise the limb of the unaffected/non-operated limb, crossing and resting it over the thigh of the affected limb (1)
- Pre-activating gluteals and abdominals, lift buttocks off the floor pushing through the heel of the affected limb, raising the hips towards the ceiling (2)
- Lower the hips back down slowly, and repeat using the opposite side if required
|
| Side Lying Hip Abduction |
Sets: 2 Reps: 10-15 (left only) |
 |
- Lie on the non-affected side
- Whilst maintaining a straight top leg, with the bottom (unaffected limb) flexed to comfort at the knee (1), proceed to squeeze the gluteal musculature and slowly abduct (lift) the affected leg as far as comfortably possible (2)
- Lower the leg with control, ensuring the pelvis is stable throughout
|
| Hip Extension (Bent Knee) |
Sets: 2 Reps: 10-15 |
 |
- Begin in a prone position (lying on your stomach)
- Bend the knee of the affected leg to 90˚
- Lift the affected leg from the bed, pushing the foot toward the roof, holding the position for 1-2 seconds, and lowering slowly
- Focus on maintaining knee position, avoiding rotation through the pelvis and limiting excessive muscular activation and ‘arching’ through the lower back
|
| Standing Hip Abduction |
Sets: 2 Reps: 10-15 (both sides) |
 |
- Begin in a standing upright position, with the band anchored to the lower leg (1)
- Ensure a stable trunk and firm gluteals prior to movement
- Squeeze the gluteals and abduct the hip to push the band out (and only slightly behind) to the side (2)
- Slowly return to the start position, and repeat.
- Quality over quantity, with stable movement is imperative
|
| Standing Hip Extension |
Sets: 2 Reps: 10-15 (both sides) |
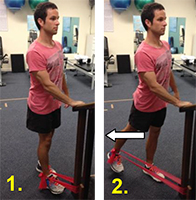 |
- Begin in a standing upright position, with the band anchored to the lower leg (1)
- Ensure a stable trunk and firm gluteals prior to movement
- Without arching the lower back or forward trunk tilt, squeeze the gluteals and extend the hip to pull the band behind the body (2)
- Slowly return to the start position, and repeat.
- Quality over quantity, with stable movement is imperative
|
| Free-standing Squats |
Sets: 2-3 Reps: 10-15 |
 |
- Stand upright with the feet shoulder width apart and even body weight through both legs (1)
- Slowly lower the trunk until the knees are bent through a 60-90° range, dependent on pain/ability
- Ensure the arms are out in front, to counterbalance the weight of your hips going back during the squat (2)
- Ensure the knees remain in line with the feet, and do not progress any further forward than the toes, with the bottom pushing out the back
- Tie a theraband firmly around thighs and maintain a firm squeeze out against the band during the squat to engage gluteals (knees remain over feet) (3,4)
|
| Isometric Hip External Rotation |
Sets: 2-3 Reps: 5-8 Hold: 3-5 secs |
 |
- Stand on one leg (the affected leg) side on to a wall, with the leg closest to the wall flexed slightly through the hip and knee, to lift the foot off the ground
- Isometrically (without movement) push the knee of the elevated leg against the wall, maintaining good pelvic stability
- Hold this position for 3-5 seconds before relaxing and pushing again
- Ensure the gluteals and abdominals remain tight, and there is no rotation in the pelvis. The trunk should also remain upright, so a support may be employed initially to maintain trunk alignment and offload the weight bearing limb slightly
|
| Side-to-Side Crab Walks |
Sets: 2 Reps: 10-20 (each way) |
 |
- Tie a theraband and place it around your thighs or lower legs (1)
- The band should be firm enough so that tension is felt when standing with your feet hip-width apart
- With hands anchoring the band (or on hips if the band is tied), abdominals tight and in a slight crouch position ensuring the bottom is pushed back, take a wide step to the left (2), then step the right foot in (3), always keep tension on the band
- Continue to repeat this process (4), and then repeat the opposite way leading with the right leg
- To increase difficulty, place theraband around ankles, or work deeper into the squat position
|
| Weight-bearing Abductor Slide |
Sets: 2-3 Reps: 10-15 (left side) |
 |
- Begin in an upright standing position with the knees bent slightly, with one foot on the floor and one (the affected) positioned on a slide disc, which could also be a piece of cardboard or towel depending on the floor surface (1)
- Whilst keeping the back straight and knees bent, slowly slide the foot on the disc out to the side (2,3)
- As the foot slides away, good movement control and lower limb alignment should be maintained – a chair may be required for some additional stability, and rememberthe body must slide with the leg (4)
- Make sure you do not travel so far as to make the return impossible
- For increased demand, use a theraband positioned around the lower thighs
|
 Download Post Injection Exercise Examples


